Enter Invoice Line - Selecting Bins and Quantities
If your company is configured for multiple bin locations and your userID allows you to edit bin locations, when you enter a quantity Ordered on the Enter Invoice Line screen, Micronet displays the Bin Locations and Quantities screen where you can select the bin(s) to allocate the stock from and the quantity from each bin.
Only bin locations that have been assigned to the item or have had the item receipted into them are available for picking of stock.
|
|

|
Technical Tip
To access this screen:
- the Allow Multiple Bin Locations per Item field on the Inventory Configuration screen must be set to a value other than No and an Available Bins Display Order should be selected – see "Edit - Program - Inventory"
- the Allow Editing of Bin Locations field in your userID must be set to allow you to edit bin locations for Invoice Creation – see "Maintenance - Edit UserIDs - 1. Main".
|
|
|
|
Technical Tip
This feature only applies to items that:
- are not serialised – each serial number in Micronet has its own bin location recorded against it. Therefore, when picking a serialised item, there is no need to select a bin location as it is already specified by the serial number.
- don’t have unit recognition – each unit of measurement processed in Micronet must also have its own bin location recorded against it.
|
To select bin locations and quantities:
- Display the Enter Invoice Line screen.
Refer to "Entering Invoice Lines - Standard".
- Enter a quantity in the Ordered field and press Enter.
Micronet displays the Bin Locations and Quantities screen. The Available Bins list displays the bins containing the item, the free stock, stock on hand and bin priority. In Micronet 2.8, this list also displays the minimum and maximum bin quantities, the In Priority for bins relating to stock coming in (e.g. goods receipts and returned items) and the Out Priority for bins relating to stock going out (e.g. picking).

- In the Available Bins list, double click on the bin you want to allocate the stock from.
Micronet displays the Edit Bin Qty screen.
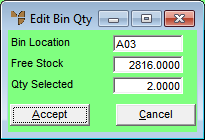
- Enter a value for Qty Selected.
This defaults to the remaining order amount or the available stock on hand, whichever is lowest.
- Select the Accept button.
Micronet redisplays the Bin Locations and Quantities screen with the new allocation added to the Current Allocations list.
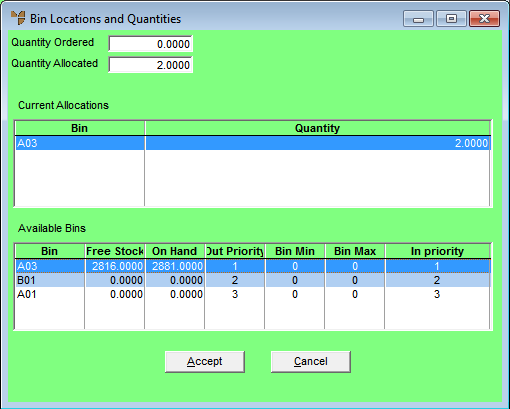
- Continue to enter bin quantities until the Quantity Allocated equals the Quantity Ordered or the available stock on hand is consumed.
- When you have finished, select the Accept button.
Micronet redisplays the Enter Invoice Line screen and updates the movement quantity with the quantity allocated from bins.
|
|
|
Technical Tip
On the Invoice Creation screen, it is possible to sort your invoice by bin location (refer to "Invoice Creation - Edit - Sort"). With multiple bins enabled, this option will sort based on the first bin location assigned to each item. It is not possible to sort based on multiple bin locations but there is a report format available to print picking slips in bin location order.
|